Manage users
In the Users area you see all of the users on your account. Here you can add or remove users, change user details, user permissions and more.
To access the Users area:
- Hover over
 (Profile icon).
 - Select Account Settings.
- Select the Users tab.
Add a user
A user with Admin permissions can add as many users to your Adjust account as you need. To add a user, select  + New user.
- (Optional) Enter the user's first and last name.
- Enter the user's company email address.
- Select the user's language preference.
- Select the user's role.
- Select the feature permissions for the user.
- Select Add user.
Set custom permissions
Adjust lets you restrict the information users can see on the Adjust dashboard using link-level, keyword-level, and partner-level custom permissions on a per-app basis. This ensures users can only see the data they need to. Custom users should always have access to at least one app.
When creating a new user or editing an existing one:
- Select the user Role as Custom (
 ).
). - Select Edit user's custom permissions.
- Apply the correct permission level for each app.
- For app-level Custom permissions, select Configure links & partners (
 ).
). - From the Links tab, you can:
- Enable the links you want to provide data access for. You must select at least one link to limit the access to attribution data.
- Refine data access using keywords.
- Optional: From the Partners tab, you can enable access to only certain partners data. This access includes any Ad Spend and SKAN data they share.
- Select Save.
Ad spend data for custom-custom users
Adjust lets you give Ad spend data access to custom-custom users. Custom permissions for Ad spend are only available on a partner-level and per-app basis.
These are the points to consider when enabling this access:
- Make sure to enable the Ad spend data feature permission when editing user's custom permissions.
- Configuring Links won't enable access to Ad spend data, instead you must select specific partners under the Partners tab.
- Make sure to select at least one partner.
New User Invitation Flow
Email Invitation
- Once a new user is created, they will receive an email with a “Confirm My Email” call-to-action. The invitation is in a state of pending for 5 days, after which time the invitation would move to expired and need to be resent if still needed.
After Email Confirmation - Depending on the user's status, they will be redirected as follows:
New to Adjust:
- The user will be taken to a “Complete Your Sign-Up” page. After completing the sign-up process, they will gain access to the Adjust dashboard.
- The user will be taken to a “Complete Your Sign-Up” page. After completing the sign-up process, they will gain access to the Adjust dashboard.
Existing Adjust User (with access to another account):
- The user will be redirected directly to the Adjust dashboard home page.
Viewing Invitations
Admins can click to "View Invitations" from the all users page by clicking the option in the near top right.
From the Invitations page there are three statuses: pending, expired and accepted.
- Pending invitations can be resent or deleted (invalidated). Invitations are in pending for 5 days after which time they become expired.
- Expired invitations can be resent or deleted (invalidated). If an expired invitation is resent the new user will have another 5 days from that point to confirm their email.
Remove a user
- Find the user from the list.
- Select
 (Edit)
 - Select Delete User.
Edit user details and permissions
To make changes to an existing user's details, select  (Edit). This opens the user profile setup.
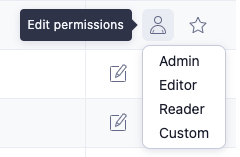
To make changes to an existing user's permissions, select  (Edit permissions). From here, you can select a new permission level for the user.
Set a main contact
Main contacts are individuals who are always notified regarding any changes that may affect your account. Using main contacts ensures that Adjust contacts the right people and reduces noise for other users on your account. Only Admin users can be set as a main contact.
To manage your main contacts, select or deselect  (Favorite) next to the user's name in the Actions panel.

 (Profile icon).
 ).
).


