Anomaly detection alerts
With Pulse's Anomaly detection alerts you can identify unusual or unexpected deviations in your data. Pulse applies a statistical tool to define an anomaly identification range based on the selected metric. It utilizes a moving average calculated from historical data and standard deviation to establish a band of values with upper and lower thresholds, called confidence interval.
The moving average from previous days serves as an anticipated value for the present day. Then, Adjust analyzes whether an estimated value falls within the predefined confidence interval. This confidence interval is essentially a range, where data points whitin are considered expected, and points outside the range are considered anomalies.
Using anomaly detection alerts helps you:
- Identify issues early: Quickly pinpoint irregularities in attribution data.
- Optimize performance: Make data-driven decisions to optimize campaign performance. Anomalies in attribution data may reveal trends, helping teams adjust strategies for better results.
- Allocate resources: By identifying anomalies in attribution data, businesses can allocate resources more effectively.
Before you begin
Here's what you need to know before getting started.
- Only Admins and Editors can set up and manage alerts. See the Permission levels article for more information about different user roles.
Your anomaly detection alerts
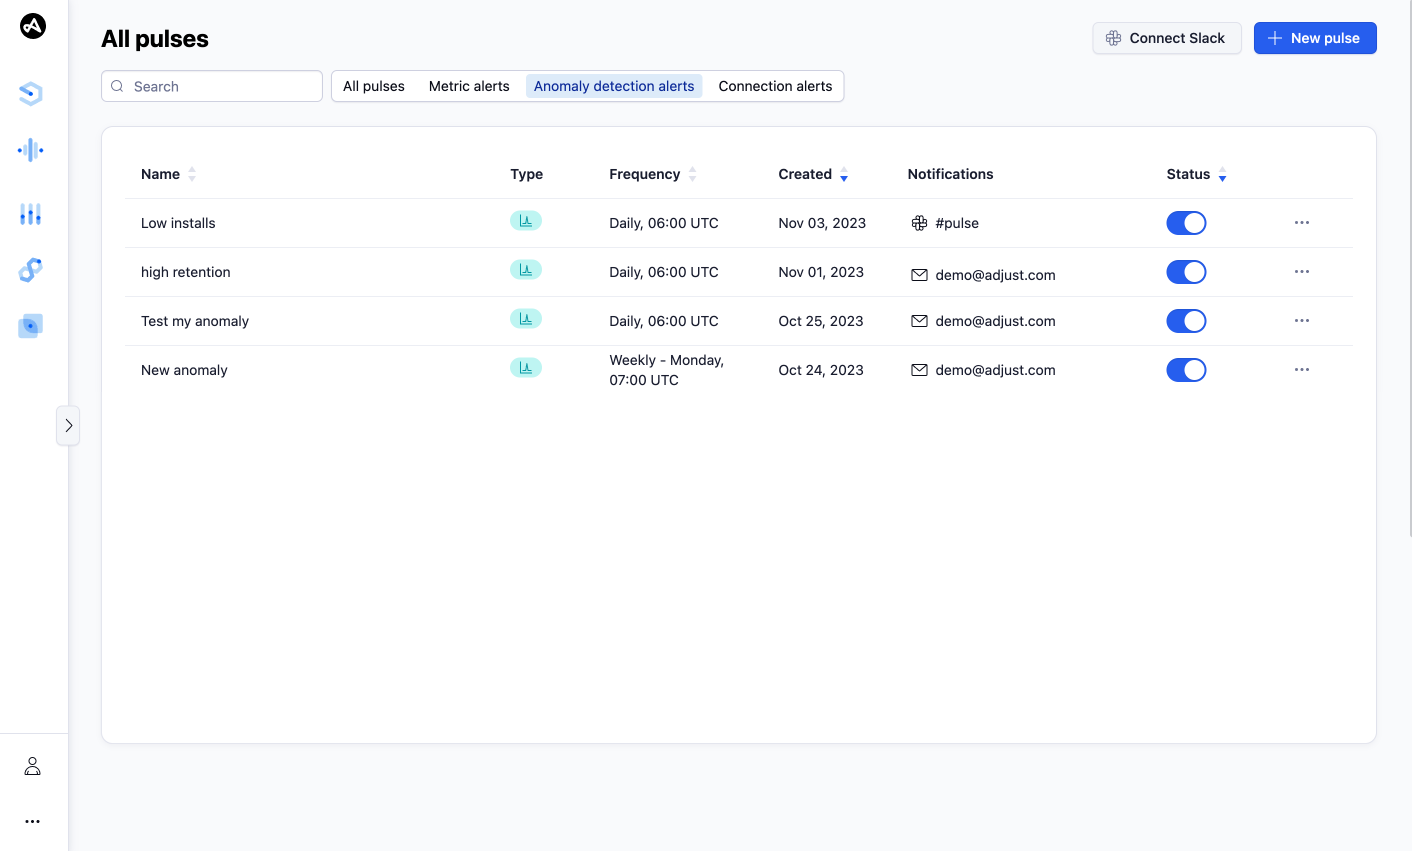
You can view the list of existing alerts on the All pulses page. Use the filter next to the search bar to toggle between all pulses, metric, connection, and anomaly detection alerts. This page gives you an overview of your alerts including their name, frequency, creation date, notification address, and status. You can manage your alerts selecting the more options ( ) button at the end of each row.
Create a new alert
To create a new alert:
- Log in to Adjust.
- In the left navigation pane, enter the Pulse section.
- Select + New Pulse.
- Select New anomaly detection alert.
- Give your new alert a name.
- Complete the following actions:
- Select the Create pulse button to finish.
Choose your data
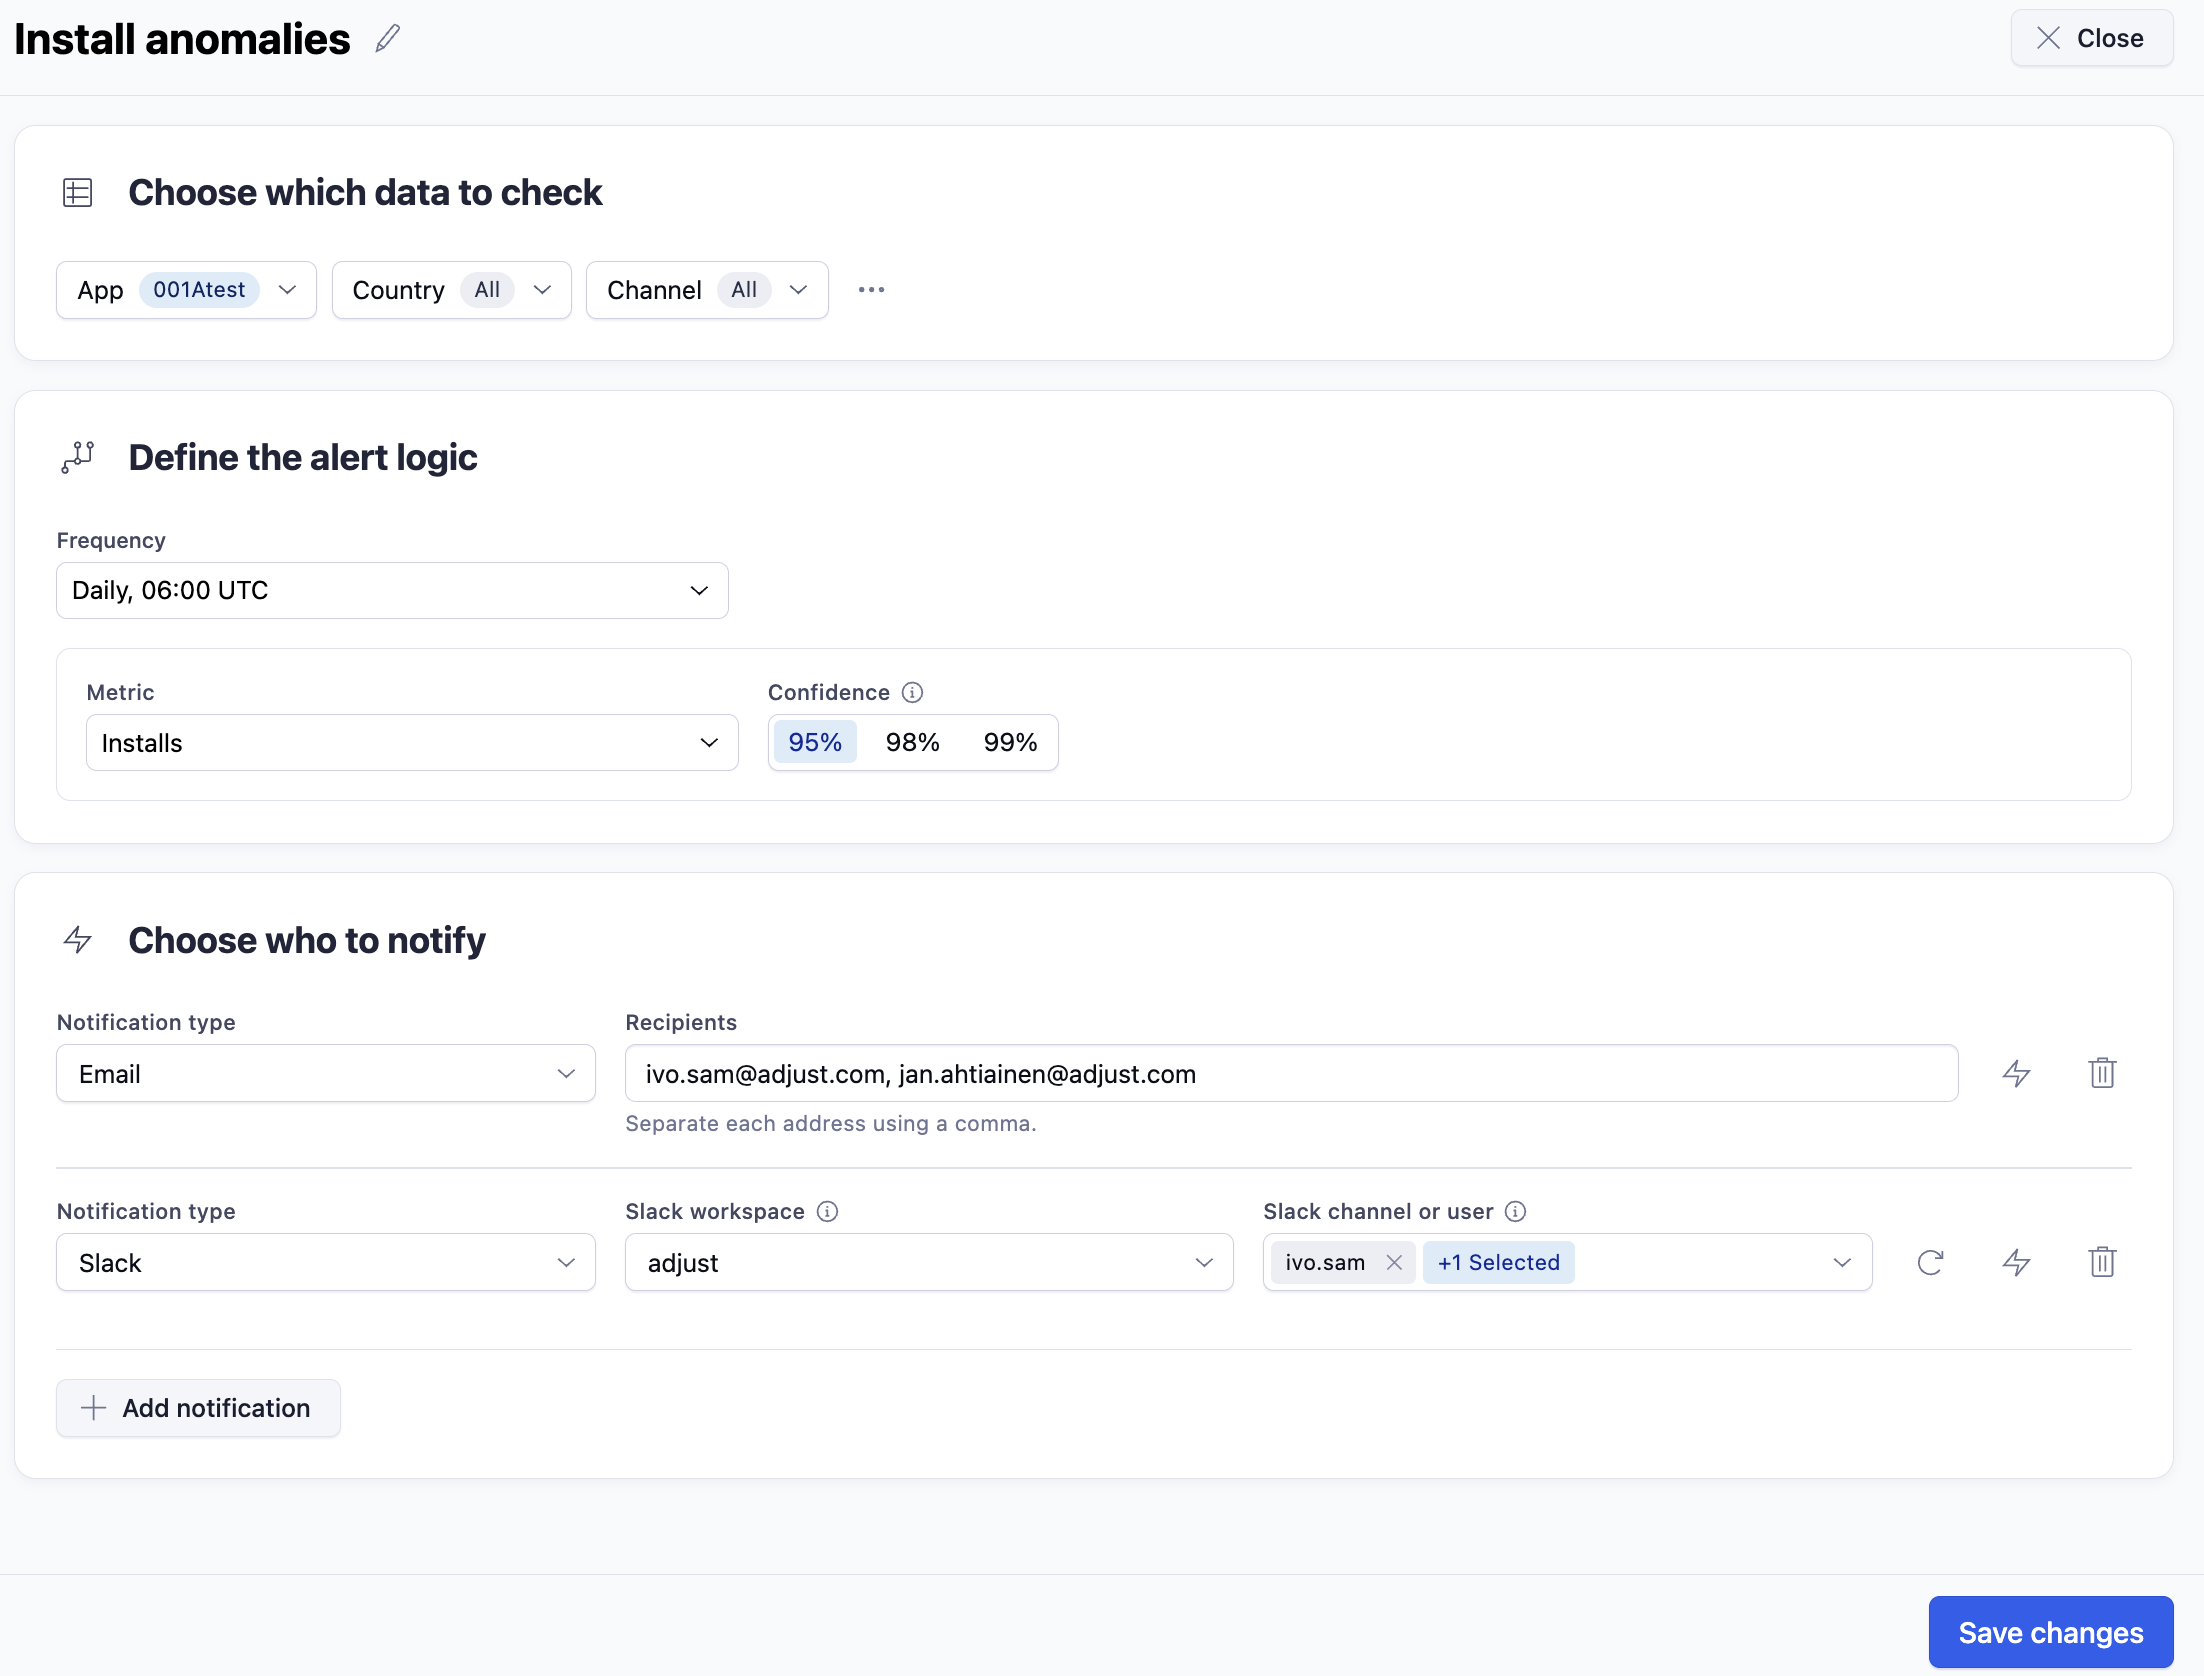
The default global filters in this section are App, Country, OS names, and Channels. You can add more by selecting the more options ( ) button.
Using these filters allows you to break down the data and refine your alert's details. For example, you want to know when a specifics Android app is experiencing install rates out of the ordinary.
Define the alert logic
To define what triggers the alert you can:
- Choose a data-check and notification frequency.
- Select the metric to observe.
- Define a confidence level.
Pulse creates and sends alerts to report all matches in logic. You can select the frequency that defines how far back Pulse checks your data, and that you would like to receive alerts. The available frequencies are:
- Daily: Runs every 24 hours. You can select any time in UTC format. By default, 06:00 UTC time is selected because it best accommodates Ad Spend and SKAN metrics using network data. You can select other hours, just be aware that data availability may be impacted when Pulse runs the job at your selected time.
- Weekly: Runs every 7 days. You can select any day and time in UTC format. By default, Monday, 06:00 UTC frequency is selected. You can select other frequency times, just be aware that data availability may be impacted when Pulse runs the job at your selected time.
Choose a Metric and a Confidence level. Pulses offers three confidence levels: 95% (default), 98%, and 99%. Your selection determines when an unsure data point is considered an anomaly. A higher confidence level means fewer anomalies will be detected.
Select who to notify
You can send alert notifications via email, Slack, and Microsoft Teams. These notifications provide a summary of what triggered the alert and when, along with high-level details. They also include direct links to view the activity report or make edits to the Pulse.
To send the notification via email, simply enter the email address. You can add as many addresses as you like, separating each by comma.
Slack
Choose your workspace or send the alerts directly to people using Slack DMs. You need to add a Slack workspace to use this notification type. See Add a Slack workspace to learn how to.
- Select Slack from the Notification type dropdown.
- Select the Slack workspace of your preference.
- Select a channel or user to notify.
Microsoft Teams
Choose your Teams channel to send alerts to. You need to add a Teams channel to use this notification type. See Add a Teams channel to learn how to.
- Select Teams from the Notification type dropdown.
- Select the Teams channel of your preference.
Manage your alerts
Edit an alert
Editing an alert enables you to modify and improve an existing one. You can also optimize your metric choices to produce more targeted results.
To edit a metric alert from your alerts list:
- Find your alert on the list.
- Open the alert editor using one of the following two options:
- Select the more options button (
 ) at the end of the row, and select the Edit (
 )option.
 - Select the alert's name and then select
 Edit pulse.
- Select the more options button (
- Make your changes.
- Select Save changes.
Rename an alert
You can change the name of the alert at any time.
To rename an alert from your alerts list:
- Find your alert on the list.
- Select the more options button (
 ) at the end of the row.
 - Select the Rename (
 )option.
 - Change the name and select Save.
Duplicate alert
You can duplicate an alert with the logic that has given you good results. You can use the same metrics or use it as a base to build new alerts.
To duplicate an alert from your alerts list:
- Find your alert on the list.
- Select the more options button (
 ) at the end of the row.
 - Select Duplicate (
 ).
). - Rename your alert and make adjustments if necessary.
- Select Create pulse.
Test alert
Pulse allows you to check if the alert is sending the notification to your selected platform.
To test an alert from your alerts list:
- Find your alert on the list.
- Select the more options button (
 ) at the end of the row.
 - Select Test alert (
 ). A success notification appears.
- Pulse sends a notification example with fake data.
- Verify that the notification got delivered.
Delete an alert
To delete an alert from your alerts list:
- Find your alert on the list.
- Select the more options button (
 ) at the end of the row.
 - Select the Delete (
)option.
- Confirm deletion by selecting Delete.
Change the status of an alert
To set an alert Active or Inactive simply find your alert on the list and use the toggle button to activate an Inactive alert or to deactive an Active one.
Anomaly detection alert example
The images illustrate how an anomaly detection alert appears in the interface. They highlight key details, including the anomaly name, the rule definition, the selected alert frequency, applied filters, the app ID, and the confidence interval associated with the alert.


 )option.
 )option.
